I have recently switched my electricity provider to tibber because they provide fair electricity prices (actually they re-sell with real market prices which is way below what other electricity provider charges these days).
They have two price models. In the basic model, they charge a monthly average price. Customers have to enter their monthly meter readings manually into the app. For the advanced pricing model, a device called the Tibber Pulse is required. This device reads out an electricity meter and sends hourly readings to tibber. This enabled per-hour prices which opportunities like charging one’s electrical vehicle during cheap pricing hours.
I started with the monthly pricing model and while I was waiting for my Tibber Pulse to arrive, I wrote a small tool to upload my daily consumtion automatically to tibber.
Today I received my Pulse and wanted to install it. Unfortunately it got stuck on a firmware update loop. According to my router, it keeps downloading stuff from an AWS bucket. While I’m waiting for a solution from tibber’s support, I use the time to have a closer look to that little device.
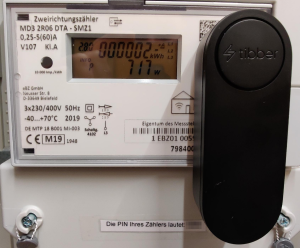
Actually, I got two devices. One is an small battery powered device that is attached to my electricity meter. It reads the meter via it’s infrared interface and sends out the readings on 868 MHz with a (yet unknown to me) protocol. Therefore it is called Tibber Pulse IR.
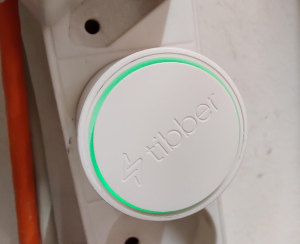
The second device, the Tibber Bridge, is a wall-plugged device that connects to a wifi and acts as bridge between the pulse and the internet. In this article I will have a deeper look onto this.
Network analysis
I started with some network analysis to see what is happening when the device got into the firmware update loop. So I started tcpdump on my router and inspected the traffic from/to the device. The results where quite unspectacular:
- Traffic between the Bridge and an WAS S3 Bucket, HTTPS – repeating all the time, probably a failed fimware download attempt
- An MQTT connection to something.iot.eu-west-1.amazonaws.com, also TLS encrypted. That seems to be the communication channel to the bridge.
- Absolutely no communication between the Bridge and the App. So I guess, everything is relayed through Tibber’s servers at AWS.
No much to figure out so far. I also did a full port scan to the device, but no port is open. At least I could lookup the vendor of the device’s MAC address – it’s Espressif, so the device is very likely powered by an ESP32.
Back to setup mode
Since the device has no port available in normal mode and all traffic is encrypted, I went back to the setup mode. This mode can easily be entered by unplugging the device, plug it and repeat this once. As soon as the green LED lights up, the device opens an access point named „Tibber Bridge“. The password is printed on the QR-Code on the device itself.
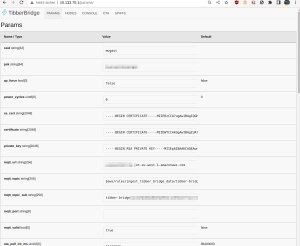
This time I did not use the tibber app to connect but my laptop instead. It gets a connection and an ip address (10.133.70.10). The Tibber Pulse Bridge itself has the IP 10.133.70.1 and provice a little nice web interface. The credentials are „admin“ and the password printed on the device.
I had expected some prompt for wifi credentials but surprisingly, the webui reveals a lot more information:
- name and key of the current stored wifi AP
- hostname, client certificate and topics of the MQTT endpoint to connect to
- URLs for firmware updates
- Details to firmware files. It confirms that this is an ESP32.
- and lot more
All of those settings can be changed in the UI. So there’s everything available to MITM-intercept the traffic and see what happens.
The setting „webserver_force_enable“ got my attention. Let’s see what happens if I update it to „true“ and boot into normal operation mode. Before that, I used the web browser to save the „params.json“ – this is the response that contains all the settings seen in the webui. If I mess anything up, I can use it to easily restore the original state.
Normal mode plus
After unplugging and re-plugging the device, it boots again in normal operation mode (and immediately begins with the endless firmware download). The main difference now is that I can still access the web interface.
What I also saw now (it was already there before but I did not see it) is that there is a „console“ tab. This console provides kind of „shell access“ to the device with tons of options.
According to the logs (using the new console with the command „dmesg“), the OTA that fails is „tibber-pulse-ir-hub-esp32“. I ran „ota_clean“ and forced the reload of the manifest. Nothing helps, I got still stuck on OTA.
MQTT adventures
Before I continue to explore the device, let’s see what is possible with the MQTT credentials the devices revealed. I created the files ca.pem, client-cert.pem and client-key.pem from the cert/key data in the params. With this it should be possible to connect to the broker.
mosquitto_sub -h ****.iot.eu-west-1.amazonaws.com --cafile ca.pem --cert client-cert.pem --key client-key.pem -t '#' -v -d
Client null sending CONNECT
Client null received CONNACK (0)
Client null sending SUBSCRIBE (Mid: 1, Topic: #, QoS: 0, Options: 0x00)
Client null sending CONNECT
Client null received CONNACK (0)
Client null sending SUBSCRIBE (Mid: 2, Topic: #, QoS: 0, Options: 0x00)
Client null sending CONNECT
Client null received CONNACK (0)
Client null sending SUBSCRIBE (Mid: 3, Topic: #, QoS: 0, Options: 0x00)
Ok, that did not work. The connection terminates as soon as the client runs a subscribe. But at least the server CA was verified correctly and my client certificate was accepted. The behaviour is quite common if some ACL prevents an arbitrary client to subscribe to everything. So let’s try again by subscribing to my own topic:
mosquitto_sub -h ****.iot.eu-west-1.amazonaws.com --cafile ca.pem --cert client-cert.pem --key client-key.pem -t 'tibber-bridge/a******c/receive' -v -d
Client null sending CONNECT
Client null received CONNACK (0)
Client null sending SUBSCRIBE (Mid: 1, Topic: tibber-bridge/ac41fdc01b3647a1953c1c0721e7711c/receive, QoS: 0, Options: 0x00)
Client null received SUBACK
Subscribed (mid: 1): 0
Way better. I have got a subscription and can check what happens when I try to access the device using the Tibber Android App. Unfortunately (but not unexpected), I cannot subscribe to the topic that is used to send data to AWS. So to analyse this traffic too, I’d need to setup an TLS- or MQTT-Proxy with the original certificate to communicate to AWS and set up my own certs on the device to trust my proxy for communication. Maybe I do it when my pulse works properly and report here later.
Conclusion
The Tibber Pulse Bridge allows unexpected insights in how that stuff works. I did not expect to get so easy access to all that information. Nevertheless, the system itself seems to be reasonable secure. I can subscribe only to my device’s subscription topic. The client certificate seems to be individually created for my device (but I cannot verify it unless I get access to another device’s certificate).
The credentials I got would allow me to intercept the treffic between the device and tibber. But since I can use their API anyway to get my meter readings, there is next to no advantage in doing so.
Unfortunately I was not able to fix my OTA issue but at least I got a log that I can send to the Tibber technical support.
In the logs I found a lot of unique keywords but none of those led me to a firmware construction kit. So I guess the firmware was developed specific for that devices, based directly on Espressif’s ESP-IDF framework.
Updates
Making it work
After one week Tibber has not yet responded to my ticket about the firmware update loop. So I checked the web UI again and tried the „Enabled Pairing“ button. That way the Pulse IR was detected and showed up in the Tibber App. I can see my consumption as well as my current power usage – so all works as expected now.
Accessing the data locally
Through a mention in a github issue comment I found a documentation how to proxy all MQTT traffic of the bridge through a local MQTT server. This is great and should also work on the german version of Tibber Pulse IR with the Tibber Bridge.


Is that MQTT proxy really required to access the data locally? I have read on the internets that there is also an HTTP interface? Did you check that?
Great work though!
Reading with HTTP is also possible but at a maximum rate of once per 2 seconds.
Ich habe die Webseite mit den Einstellung nur gesehen als ich den Bridge noch nicht mit der Tibber App verknueoft hatte. Leider hat mir mein Stromzahler nichts angezeigt, der Pulse war falsch montiert, er hat nur die Daten vom Stromzähler angezeigt aber keine Messerte bei Pairing ueber die webseite. Wo genau soll dieser Eintrag „webserver_force_enable“ den sein? Ein Bild wäre gut gewesen, seit der Tibber App benutzung komme ich auf die 10er Adresse mit dem Webbrowser nicht mehr drauf. Eine Alternative zum auslesen wäre gut, wenn man entschließt kein Kunde mehr sein zu wollen, da die API dann nichts mehr zulässt, so wie ich das verstanden hatte. Ich will nur die Daten in Node Red uebergeben, um sie zu sichern und besser Auswerten zu können.
Der Eintrag ist unter Params. Console ist ein Menüpunkt, auf dem Screenshot unter „Back to setup mode“ kann man den sehen.
On my bridge there is no console. At the top row you only find params and nodes. I use the German tibber, the type of the bridge is TJH01
Hi,
Thanks for writing up your experiences with Tibber Pulse. I’m struggling with the very same issues (hung OTAs). I really can’t imagine that this stuff works at all
I finally solved it by using a different uplink (my home runs on LTE which seemed to cause that issue).
Supposing the update issue was cleared, I’m interested to learn, whether I got it correctly: you managed the local tibber system (in German version it would be Pulse IR and Bridge) to communicate with the tibber server and with your local MQTT? Does it work?
This would be very interesting for me. (My Pulse IR and Bridge and the Android Tibber App are running fine, however I would like to evaluate the cost effect based on my real hourly consumption before signing the power purchase contract).
I did not but the guys from https://github.com/MSkjel/LocalPulse2Tibber did so.
I use a hardware solution to multiplex my meter data to pulse and my own reading head.
This is very interesting. I would love to use tibber without pulse. I already have a IR head on my meter and have all the data every second available on my local mqtt. And: I have no wifi where the meter is. So best for me would be to use the existing infrastructure and push my data to tibber and not use the Tibber Pulse and Bridge.
Do you think this could be achieved somehow?
Could be possible but it’s _really_ hacky. There are projects which intercept the data between pulse brige and Tibber’s MQTT. But everytime they change something, it will break.
Just an idea: you could read out the data with your own IR head and send it to your infrastructure. On a place where you have wifi, you grab the data, send it back to a IR diode and feed it into the pulse IR.
Hiw did you do that? Phototransistor, buffer.,IR diode or anything fancy?
Nothing fancy. IR transistor, IR LED, some transistors: https://github.com/micw/ir-lesekopf
Hello mwyraz,
could you tell us more about your hardware solution?
Any source to buy or build it?
Thanks a lot and best regards
Tobias
Here’s my hardware solution: https://github.com/micw/ir-lesekopf
How did you do that? Just a photodiode to a schmidt trigger buffer and two IR-LEDs on the output?
I even skipped the schmidt trigger, my test setup without it worked instantly.
Thank you for this write-up – very helpful.
Hallo Michael, vielen Dank für für den interessanten Post. Du hast beeindruckend viel Know-How zu MQTT (Protokoll, Handshake, Server, Broker, Client – das ganze Geraffel). Ich fange damit gerade an. Kannst du ein Tutorial oder Literatur empfehlen? Deutsch oder Englisch, ist egal.
Leider nicht, das Wissen hat sich durch diverse Projekte „angesammelt“ 😉
I have an Easymeter Q3DA1004 V3.03 which sends SML opalny trough its top. I have a tasmota-bases reader that works fine. The Pulse does not recognize the data. Any ideas?
Evtl. mal schauen, ob Du zwischen SML Standard und SML für Smartmeter (EDL?) umschalten kannst
Hallo zusammen, Anfangs hat die Anleitung funktioniert. Nach einem Reset und erneutem Versuch das WEBIF zu aktivieren klappt es leider nicht mehr. Nach dem Reset kann ich mich mit der britge verbinden, aber beim aufruf der Adresse 10.133.70.1 bekomme ich nur noch oben das Tibber Logo und die Links zu den einzelnen Unterseiten angezeigt. “ TibberBridge Params Nodes Console OTA SPIFFS“
auf dem letzten Link bekomme ich nach eingabe des Benutzers und PW einen dateiserver angezeigt, die anderen links funktionieren nicht. Ich habe bereits mehrere Geräte ausprobiert ohne Erfolg. Kann es an einer zu neuen Firmware liegeen? die Neukoppelung über die Tibberapp klappt aber ohne aktiviertes WEBIF. Kennt jemand das Problem? vielen Dank Stephan
Hi!
Ich habe das gleiche Problem. Allerdings habe ich erst mit dem Basteln angefangen, seit meine Bridge heute morgen meinte sich nicht mehr verbinden zu können.
Gehe ich auf das Webinterface, bekomme ich ebenfalls die von Stephan beschriebene leere Seite angezeigt. Konntest du das irgendwie lösen?
Gruß, crsp
Servus, könnt ihr mir die aktuelle Version für TJH01 sagen? Bei Auslieferung habe ich 2310.1 … Danke Stephan
Hallo.
Dieses Problem hatte ich auch mit meinem neuen Pulse. Dieser muss einmal mit der App konfiguriert werden. Dann macht er Firmware Updates. Wenn man die Bridge dann zurück setzt kommt man an die Parameter.
Martin
Seit gestern Nacht funktioniert der Webserver nicht mehr, und die Option ist aus den PARAMS verschwunden. Anscheinend hat Tibber das mit einem Firmwareupdate abgeschaltet.
FYI:
Newer versions of the Bridge Firmware hide several config parameters from the user including „webserver_force_enable“.
However it might still be possible to edit the invisible parameters from the console.
„param_list“ gives you all available config parameters including the invisible ones.
For „webserver_force_enable“ it seems to you have to use „param_set 39 true“ followed by a „param_store“.
Be warned though that i haven’t tried it myself, also „webserver_force_enable“ might not always be linked to number 39 so better check before with „param_list“.
Another possibility is to use your browsers script overwrite function since the visibilty switch is just a whitelist in the main.js file on your device.
On Firmware 1390 this is done by the following lines of code:
var PAIRING_PARAMS = [„ssid“, „psk“, „mqtt_url“, „mqtt_port“, „mqtt_topic“, „mqtt_topic_sub“, „ca_cert“, „certificate“, „private_key“, „update_url“];
function filterPairingParams(item) {
return PAIRING_PARAMS.includes(item.name);
}
I activated script overwrite in the Debug Console of Firefox and changed the return statement to simply „return true;“ and gained access to all config parameters on the webinterface again.
Firefox Ssript overwrite seems to use a local copy of the JS File for this, so you might have to redo this with future FW updates since these are likely to change the original file